Starry projector lights are the unsung heroes of everyday magic. These clever devices paint your room with stars, turning ordinary spaces into dazzling galaxies. It’s a front-row seat to a celestial show, no telescope required. But to keep the spectacle alive, one skill stands above the rest: charging your starry projector light.
Why the focus on charging, you ask? Simple. Understanding the right way to juice up your gadget means the difference between a long-lasting star show and a short-lived twinkle. It’s all about giving your device the energy it needs while protecting its delicate internal components. Trust us, it’s easier than spotting Orion’s Belt on a cloudy night.
This article won’t just help you master charging. We’ll take a deep dive into the types of starry projector lights, the mechanics behind their power sources, and the steps for correct charging. Ready for a journey of cosmic proportions? Let’s get started.
Charge Your Starry Projector Light: Step-by-step Guide
Every starry projector light is unique, but the charging principles stay pretty consistent. Here’s a general guide to get your star show on the road:
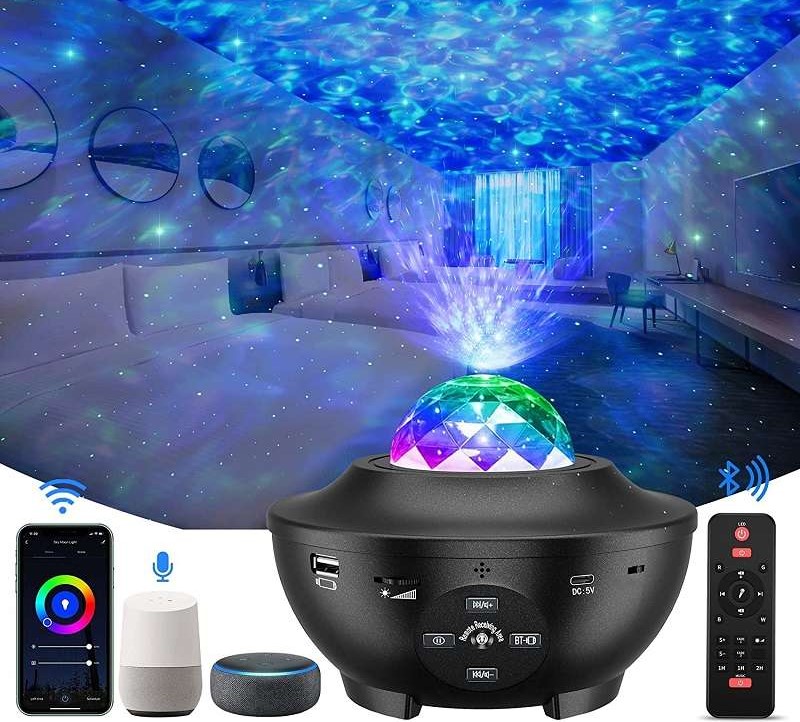
- Locate the Charging Port: The first step is to identify where the charging port on your projector is. It’s usually on the side or at the back of the device.
- Choose the Right Cable: Ensure you have the correct charging cable. This could be a standard USB, a USB-C, or a proprietary cable that came with your device. Remember, using the right cable is critical for both safety and effectiveness.
- Connect the Cable: Connect one end of the charging cable to your starry projector light, making sure it’s securely in place.
- Plug into Power Source: Next, plug the other end of the cable into a power source. This could be a wall socket, a laptop, or a power bank, depending on your device’s requirements and your convenience.
- Turn Off the Device: It’s generally best to turn off your projector while charging. This not only speeds up the charging process but also helps prolong the device’s lifespan.
- Watch for Indicators: Most starry projector lights will have a light indicator that signals when the device is charging and when it’s fully charged. Keep an eye on these indicators to know when to disconnect.
- Disconnect When Done: Once the device is fully charged, unplug it promptly. Overcharging could potentially damage the battery and affect its overall lifespan.
And there you have it! A simple yet efficient way to fuel up your starry projector light. This is a general guide, so always refer to your device’s manual for specific instructions.
Understanding Your Starry Projector Light
Before we dive into the charging process, let’s take a moment to appreciate the starry projector light’s variety and technology. From simple, single-colored projectors that add a dash of stardust to your room, to more advanced models that can project a multicolored, rotating field of stars complete with nebula clouds – the options are as vast as the cosmos themselves.
But regardless of the model, there’s one component that’s always crucial – the power source. Just like a star needs its nuclear fusion to shine, a projector needs its power source to function. Whether it’s a built-in rechargeable battery, a power cord, or even a USB cable, the power source is the heartbeat of your projector. It’s what brings the device to life, casting those spectacular galaxies onto your walls and ceiling.
So, how does charging fit into this picture? Think of charging as refueling your spaceship for its next cosmic voyage. When you connect your projector to a power supply, you’re essentially replenishing its energy stores, preparing it for the next magical star show. Charging is a straightforward process, but it’s one that requires careful handling to ensure longevity and optimal performance. As we move forward, we’ll shed light on the step-by-step process, charging best practices, and tips for troubleshooting common issues.
Common Mistakes When Charging Your Starry Projector Light
Charging a starry projector light isn’t rocket science, but there are some common mistakes that could dim your stargazing experience. Let’s uncover these pitfalls and how to sidestep them:
- Using the Wrong Cable: This is a common error that could potentially harm your device. Always use the cable that came with your projector or a compatible replacement recommended by the manufacturer.
- Overcharging: Leaving your projector plugged in even after it’s fully charged might seem harmless, but it can wear out the battery over time. Keep an eye on the charge indicators and unplug your device when it’s fully juiced up.
- Ignoring the Power Source: Not all power sources are created equal. Charging from a laptop or a power bank may take longer than from a wall socket. Choose your power source based on your projector’s requirements and your convenience.
- Charging While in Use: It’s usually best to let your device rest while it’s charging. This can help extend the device’s lifespan and ensure it’s ready to give you a mesmerizing star show when needed.
- Neglecting the Manual: Your device’s manual is your best friend. It contains specific instructions on how to best care for and charge your starry projector light. Ignoring it could lead to unnecessary errors.
Avoiding these mistakes will not only help you charge your projector effectively but also prolong its life and ensure it’s always ready to transport you to the stars.
Starry Projector Charging Tips and Best Practices
To make sure your starry projector light continues to shine bright, here are some expert tips and best practices for charging:
- Right Cable, Right Charger: Always use the provided charger and cable that comes with your projector light, or a manufacturer-recommended one.
- Avoid Overcharging: To prevent battery damage, remove your device from the charger once it’s fully charged.
- Understand Undercharging: While overcharging can wear out your battery, undercharging isn’t great either. Constantly allowing the battery to drain completely before recharging can reduce its overall lifespan.
- Check for Indicators: Most projectors have light indicators to show the charging status. Some might flash, others might change color. Get familiar with these indicators to know when your device is fully charged.
- Switch Off During Charging: If possible, turn off your projector light while it’s charging. This can enhance the charging speed and improve battery health.
- Maintain Your Device: Regularly clean the charging port of your projector light. Dust and debris can affect the charging efficiency and potentially damage the device.
- Safe Environment: Try to charge your device in a cool, dry place. Extreme temperatures can affect the battery performance.
- Follow the Manual: Last but not least, always refer to your device’s user manual for specific charging instructions.
With these tips, you’ll not only optimize your device’s charging process but also ensure it keeps lighting up your world for years to come.
Starry Projector Troubleshooting Charging Issues
Even when the stars align, charging issues may still crop up. Don’t worry, though. Most of these are common problems with simple solutions. Here’s a quick troubleshooting guide for your starry projector light:
- Device Doesn’t Charge: If your projector doesn’t show any signs of charging, check your cable and power source. Try using another cable or plug it into a different power source. If the problem persists, the issue may lie in the device itself.
- Charging Too Slow: Slow charging can be due to a weak power source. If you’re charging from a laptop or power bank, try switching to a wall socket. Also, remember that your device charges faster when it’s turned off.
- Device Stops Charging: If your projector suddenly stops charging, it might be an issue with the charging cable or power source. Try to wiggle the cable gently to see if it starts charging again. If it does, you might need a new cable.
- Battery Drains Quickly: If the battery isn’t holding the charge as it should, you might be dealing with an aging battery. Unfortunately, this often means a replacement battery or device is needed.
You may like: How to Flip Epson Projector Image
You may also like: How To Adjust Nebula Projector
Maintaining Your Starry Projector Light
While charging is key, proper maintenance can be the secret to a long-lasting starry projector light. Here’s how you can take stellar care of your device:
- Clean Regularly: Dust and debris can affect your device’s performance and lifespan. Wipe the outer casing with a soft, dry cloth regularly and use compressed air to gently clean the projector lens.
- Handle with Care: These devices are often delicate. Be gentle when plugging and unplugging the charging cable to avoid damaging the charging port. Also, remember to store your device in a safe, secure place when not in use.
- Avoid Moisture and Heat: Keep your projector away from water and high temperatures. These elements can damage the internal components. A cool, dry place is your best bet.
- Regular Charging: Regularly charging and using your device helps keep the battery healthy. Avoid letting the battery completely discharge before recharging.
- Check for Updates: If your device has smart features, it might receive firmware updates. Stay up-to-date to ensure optimal performance.
- Consult the Manual: Regularly revisit the manual for any specific maintenance tips.
With these practices in place, your starry projector light will continue to perform at its best, ensuring you many more beautiful, star-lit nights to come.
FAQ About Charge a Starry Projector Light
What kind of cable do I need to charge my starry projector light?
The type of cable needed varies by device. Most often, it’s a standard USB, a USB-C, or a proprietary cable. Always refer to the user manual or the device’s labeling for specific information.
Can I charge my projector light from my laptop?
Yes, most starry projector lights can be charged from a laptop. However, it might take longer than charging from a wall socket. Always check your device’s manual for guidance on charging sources.
How long does it usually take to fully charge a starry projector light?
Charging times can vary depending on the model and power source, but on average, it could take anywhere from 2 to 4 hours. Check your device’s manual for specific charging times.
My projector light isn’t charging. What could be the problem?
There could be several reasons for this. It might be a faulty cable, an issue with the power source, or a problem with the device itself. Try different cables or power sources, and if the problem persists, contact customer service.
Is it okay to use the projector light while it’s charging?
While some devices might allow for use during charging, it’s generally best to avoid this. Using the device while charging can generate heat and potentially shorten the device’s lifespan.
I left my starry projector light charging all night. Could this damage it?
Many devices have mechanisms to prevent overcharging, but routinely leaving your device charging for prolonged periods can potentially harm the battery. It’s best to unplug the device once it’s fully charged.
How often should I charge my starry projector light?
This depends on how frequently you use the device. Generally, it’s best to charge the device when the battery is low but not completely drained. Frequent full discharges can shorten the battery’s lifespan.
Conclusion
Charging your starry projector light may seem straightforward, but it’s crucial to do it correctly to ensure a long and brilliant service from your device. From understanding your projector’s charging needs to recognizing and preventing common charging mistakes, every piece of knowledge contributes to a more enjoyable star-gazing experience.
We’ve learned that using the right cable, avoiding overcharging, and understanding your device’s indicators are critical for successful charging. Simultaneously, simple practices like cleaning your device regularly, handling it with care, and keeping it away from moisture and heat can greatly extend its lifespan.